

Mixing slip should be easy, but it is nearly impossible to get it right when not knowing what to do. So when working with dry slip, it is pretty easy to follow the instructions, but materials can still play games. It is surprising to see how much cold water versus hot water makes a difference, filtered tap water or not filtered, and even humidity. The minor changes can affect results, but it should not stop someone from a successful mix only by so much. Let us briefly go over how to mix a slip and check that it is correctly mixed.
So when starting, weigh how much dry material to use. In a separate bucket, we will be adding water. With adding water, an excellent average starting point is 40% to 50% water. So if we have 10Lbs of dry slip, we will want to start by adding 4Lbs of water (64 fluid ounces). When we break that down into how many fluid ounces of water per pound of dry slip, it equals 6.4Fl oz(40%) up to 8Fl oz (50%) at most. Every dry slip can be different, so we should have a starting point and a maximum point to not go over. If having too much water, the clay will settle to the bottom, and the water will be on top.
Once there's water in the bucket, we will want to add Darvan #7. Darvan is a deflocculant that separates all clay particles from sticking together so it will be liquid. If just adding water, it would stay clumpy and thick. We can add .03% to .07% Darvan per pound of dry slip that we will be adding to the water. The math would be: 16oz(1Lb) x .003 = .048oz of Darvan, which translates to 1.4mL of Darvan per pound. This is a good point to start from, and we can always add more Daravan, but if adding too much, we need to add more clay and water to even it out. Odd problems when casting can happen with too much Darvan.
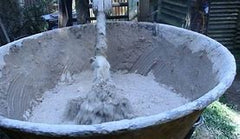
Now we have 64oz of water in our bucket and 1.4mL of Darvan off to the side. Let us start adding the dry slip mix (wear a respirator and be in a well-ventilated area). The water and clay will start turning thick and thats when we add our Darvan. Once we add it all to the bucket, we can start mixing it with a drill. Start mixing it, and once it looks like all of the dry material has been mixed, we can call it good to rest. It is best to put lots of energy into mixing it for the best results. We have a slip mixer that mixes the slip for several hours or until the slip gets nice and warm. We will also want to let it sit for a few hours, 8 hours is good. We want all of the dry material to break down into the water before our next step.
Now that it is mixed and sat for some time, we can sieve the slip. Use a 40 mesh sieve or greater to remove extra impurities from the mix. If we feel comfortable trusting the mix, then go with it, but if we like double checking ourselves or if issues arise, let us do this step. Get some volume measuring device like a measuring cup, or the best is a plastic syringe. Weigh the measuring device to zero it out on the scale. Then add 30mL of slip and write down that weight. Then clean the slip out and weigh 30mL of water. Now we divide the slip weight by the water weight. So if the slip weighed 44 grams and the water weighed 25 grams, then we go 44 divided by 25 = 1.76 So our SPG (specific gravity) is 1.76.

Once we have the specific gravity around 1.75 to 1.8, then we are good to go. We might want to check the viscosity of the slurry as well. Now we do not do this because it is usually close enough to our mix. However, the viscosity will tell us how our fluid is flowing. If it is too thick, but our specific gravity is perfect, we might need a little more Darvan. The best test to do before adding Darvan is to cast it into a mold to see how it works for our needs.
To make the mix flow better, add less Darvan rather than too much to start, maybe .25mL for small batches. Start mixing the slip till we almost have a vortex going, and then pour the Darvan into the vortex to see how much deeper the vortex goes from mixing it in. Once the vortex stops getting deeper, then stop adding Darvan, or if it is at a better consistency. We can use a viscosity measuring cup to help here. But for us, we have mixed it so many times that we know how it is supposed to flow off of our mixing blade. When we have used the same mixing recipe, we will almost always come out with the same results.
To make the mix flow better, add less Darvan rather than too much to start, maybe .25mL for small batches. Start mixing the slip till we almost have a vortex going, and then pour the Darvan into the vortex to see how much deeper the vortex goes from mixing it in. Once the vortex stops getting deeper, then stop adding Darvan, or if it is at a better consistency. We can use a viscosity measuring cup to help here. But for us, we have mixed it so many times that we know how it is supposed to flow off of our mixing blade. When we have used the same mixing recipe, we will almost always come out with the same results.

So we went over what we need to know to start to mix our dry slip. It is not too hard but slip can hold us up when going in blind for the mix. If you have any questions, you can comment below or email us for a faster response. Remember to check out our molds and slip for when you get started. We will have our slip available by the gallon or half a gallon pre mixed.
0 comments